oracle 11gR2 for Linux 静默安装
此文档是应用于在没有图形界面Linux下Oracle 11g安装方式。
一、环境配备
1.oracle 11g R2 安装包一份,在官网下载会有两个安装包,分别为linux.x64_11gR2_database_1of2.zip、linux.x64_11gR2_database_2of2.zip两个文件。此链接为11.2.0.1.0版本的Oracle。
2.Linux主机一台。本实验采用最小化安装的Centos 6.8系统。
二、安装Oracle 11g R2
1.依赖包安装
yum -y install binutils* compat* gcc* glibc* ksh* libgcc* libstdc* libaio* make sysstat*
2.修改/etc/sysctl.conf 文件并添加如下内容:
fs.aio-max-nr = 1048576
fs.file-max = 6815744
kernel.shmall = 2097152
kernel.shmmax = 48719476736
kernel.shmmni = 4096
kernel.sem = 250 32000 200 200
net.ipv4.ip_local_port_range = 9000 65500
net.core.rmem_default = 262144
net.core.wmem_default = 262144
net.core.wmem_max = 1048586
net.core.rmem_max = 4194304
执行以下命令,使命令生效。
/sbin/sysctl -p
3.修改/etc/security/limits.conf 添加如下内容:
oracle soft nproc 2047
oracle hard nproc 16384
oracle soft nofile 1024
oracle hard nofile 65536
4.修改 /etc/pam.d/login 添加如下内容:
session required pam_limits.so
5.修改 /etc/profile
if [ $USER = "oracle" ] ; then
if [ $SHELL = "/bin/ksh" ]; then
ulimit -p 16384
ulimit -n 65536
else
ulimit -u 16384 -n 65536
fi
umask 022
fi
6.创建oracle属组并添加oracle 用户
groupadd -g 501 oinstall
groupadd -g 502 dba
groupadd -g 601 asmadmin
groupadd -g 602 asmdba
groupadd -g 603 asmoper
useradd -u 1101 -g oinstall -G dba  oracle
7.创建oracle软件安装目录以及安装文件存放目录,并挂载光盘,复制安装文件至安装存放目录。
mkdir -p /u01/app/oracle
chown -R oracle:oinstall /u01/app
chmod -R 775 /u01
mkdir /oracle_install_file
mount /dev/sr0 /media
cp -R /media/* /oracle_install_file
chown -R oracle:oinstall /oracle_install_file
chmod -R 755 /oracle_install_file
8.将以下内容添加至/home/oracle/.bash_profile文件中。
export ORACLE_SID=orcl
export ORACLE_BASE=/u01/app/oracle
export ORACLE_HOME=$ORACLE_BASE/product/11.2.0/db
export PATH=$ORACLE_HOME/bin:$PATH
umask 022
9.vi /etc/oraInst.loc
inventory_loc=/u01/app/oraInventory
inst_group=oinstall
10.根据实际情况编辑/etc/hosts文件,使主机与IP对应
192.168.75.3 a.wlzs.cn
11.静默安装 11.2.0.1 采用 debug模式安装 ,如果有异常则更容易发现错误原因。
su oracle
source /home/oracle/.bash_profile
./runInstaller -silent -debug -force -noconfig -IgnoreSysPreReqs \
oracle.install.responseFileVersion=/oracle/install/rspfmt_dbinstall_response_schema_v11_2_0 \
oracle.install.option=INSTALL_DB_SWONLY \
DECLINE_SECURITY_UPDATES=true \
UNIX_GROUP_NAME=oinstall \
INVENTORY_LOCATION=/u01/app/oraInventory \
SELECTED_LANGUAGES=en,zh_CN,zh_TW \
ORACLE_HOME=/u01/app/oracle/product/11.2.0/db \
ORACLE_BASE=/u01/app/oracle \
oracle.install.db.InstallEdition=EE \
oracle.install.db.isCustomInstall=false \
oracle.install.db.DBA_GROUP=dba \
oracle.install.db.OPER_GROUP=dba
附上oracle软件静默安装的参数含义如下:
-silent 表示以静默方式安装,不会有任何提示
-force 表示允许安装到一个非空目录
-noconfig 表示不运行配置助手netca
-responseFile 表示使用哪个响应文件,必需使用绝对路径
oracle.install.responseFileVersion 响应文件模板的版本,该参数不要更改
oracle.install.option 安装模式选项,本例只安装oracle软件,该参数不要更改
DECLINE_SECURITY_UPDATES 是否需要在线安全更新,设置为false,该参数不要更改
UNIX_GROUP_NAME oracle 用户用于安装软件的组名
INVENTORY_LOCATION oracle 产品清单目录
SELECTED_LANGUAGES oracle 运行语言环境,一般包括引文和简繁体中文
ORACLE_HOME oracle安装目录
ORACLE_BASE oracle基础目录
oracle.install.db.InstallEdition 安装版本类型,一般是企业版
oracle.install.db.isCustomInstall 是否定制安装,默认Partitioning,OLAP,RAT都选上。根据自己的需要选择组件。
oracle.install.db.customComponents 定制安装组件列表:除了以上默认的,可加上Label Security和Database Vault
oracle.install.db.DBA_GROUP oracle 用户用于授予osdba权限的组名
oracle.install.db.OPER_GROUP oracle 用户用于授予osoper权限的组名
如果安装成功,将会出现以下提示。
以下配置脚本需要以 "root" 用户的身份执行。
 #!/bin/sh
 #要运行的 Root 脚本

/u01/app/oracle/product/11.2.0/db/root.sh
要执行配置脚本, 请执行以下操作:
         1. 打开一个终端窗口
         2. 以 "root" 身份登录
         3. 运行脚本
         4. 返回此窗口并按 "Enter" 键继续

Successfully Setup Software.
copying /u01/app/oraInventory/logs/oraInstall2016-08-19_01-11-31PM.err to /u01/app/oracle/product/11.2.0/db/cfgtoollogs/oui/oraInstall2016-08-19_01-11-31PM.err
copying /u01/app/oraInventory/logs/oraInstall2016-08-19_01-11-31PM.out to /u01/app/oracle/product/11.2.0/db/cfgtoollogs/oui/oraInstall2016-08-19_01-11-31PM.out
copying /u01/app/oraInventory/logs/installActions2016-08-19_01-11-31PM.log to /u01/app/oracle/product/11.2.0/db/cfgtoollogs/oui/installActions2016-08-19_01-11-31PM.log
使用root用户执行以上提示的命令。
sh /u01/app/oracle/product/11.2.0/db/root.sh
12.静默安装DB
安装完成oracle软件之后还没创建db,我们可以继续使用静默方式创建数据库。
编辑db.rsp
[GENERAL]
RESPONSEFILE_VERSION = "11.2.0"
OPERATION_TYPE = "createDatabase"
[CREATEDATABASE]
GDBNAME = "orcl"
SID = "orcl"
TEMPLATENAME = "New_Database.dbt"
SYSPASSWORD = "126.com"
SYSTEMPASSWORD = "126.com"
SYSMANPASSWORD = "126.com"
DBSNMPPASSWORD = "126.com"
DATAFILEDESTINATION ="/u01/app/oracle/oradata"
STORAGETYPE=FS
CHARACTERSET = "AL32UTF8"
DATABASETYPE = "MULTIPURPOSE"
AUTOMATICMEMORYMANAGEMENT = "FALSE"
TOTALMEMORY =8192
创建完成后执行以下命令。根据实际情况更改。
dbca -silent -responseFile db.rsp
静默安装过程如下:
1% 已完成
正在创建并启动 Oracle 实例
2% 已完成
3% 已完成
5% 已完成
正在创建数据库文件
9% 已完成
正在创建数据字典视图
10% 已完成
11% 已完成
12% 已完成
13% 已完成
14% 已完成
15% 已完成
17% 已完成
18% 已完成
19% 已完成
20% 已完成
21% 已完成
正在添加 Oracle JVM
26% 已完成
32% 已完成
37% 已完成
39% 已完成
正在添加 Oracle Text
40% 已完成
41% 已完成
42% 已完成
添加 Oracle XML DB
44% 已完成
45% 已完成
46% 已完成
49% 已完成
50% 已完成
正在添加 Oracle Multimedia
51% 已完成
61% 已完成
正在添加 Oracle OLAP
62% 已完成
63% 已完成
64% 已完成
正在添加 Oracle Spatial
65% 已完成
66% 已完成
67% 已完成
72% 已完成
添加 Enterprise Manager 资料档案库
74% 已完成
75% 已完成
添加 Oracle Application Express
79% 已完成
82% 已完成
添加 Oracle Warehouse Builder
86% 已完成
90% 已完成
正在进行数据库创建
91% 已完成
92% 已完成
93% 已完成
96% 已完成
100% 已完成
有关详细信息, 请参阅日志文件 "/u01/app/oracle/cfgtoollogs/dbca/orcl/orcl1.log"。
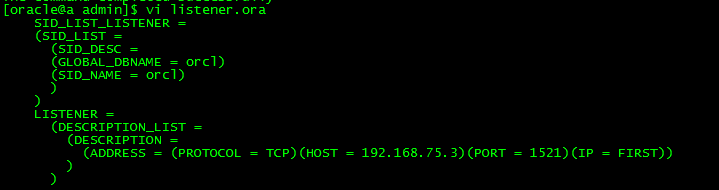
13.配置网络监听
vi /u01/app/oracle/product/11.2.0/db/network/admin/listener.ora
根据实际情况进行编辑
SID_LIST_LISTENER =
(SID_LIST =
  (SID_DESC =
  (GLOBAL_DBNAME = orcl)
  (SID_NAME = orcl)
  )
)
LISTENER =
  (DESCRIPTION_LIST =
    (DESCRIPTION =
      (ADDRESS = (PROTOCOL = TCP)(HOST = 192.168.75.3)(PORT = 1521)(IP = FIRST))
    )
  )
设置完成后,执行以下命令。
[oracle@a admin]$ lsnrctl start

LSNRCTL for Linux: Version 11.2.0.1.0 - Production on 20-AUG-2016 04:55:59

Copyright (c) 1991, 2009, Oracle.  All rights reserved.

Starting /u01/app/oracle/product/11.2.0/db/bin/tnslsnr: please wait...

TNSLSNR for Linux: Version 11.2.0.1.0 - Production
System parameter file is /u01/app/oracle/product/11.2.0/db/network/admin/listener.ora
Log messages written to /u01/app/oracle/diag/tnslsnr/a/listener/alert/log.xml
Listening on: (DESCRIPTION=(ADDRESS=(PROTOCOL=tcp)(HOST=192.168.75.3)(PORT=1531)))

Connecting to (DESCRIPTION=(ADDRESS=(PROTOCOL=TCP)(HOST=192.168.75.3)(PORT=1531)(IP=FIRST)))
STATUS of the LISTENER
------------------------
Alias                     LISTENER
Version                   TNSLSNR for Linux: Version 11.2.0.1.0 - Production
Start Date                20-AUG-2016 04:55:59
Uptime                    0 days 0 hr. 0 min. 0 sec
Trace Level               off
Security                  ON: Local OS Authentication
SNMP                      OFF
Listener Parameter File   /u01/app/oracle/product/11.2.0/db/network/admin/listener.ora
Listener Log File         /u01/app/oracle/diag/tnslsnr/a/listener/alert/log.xml
Listening Endpoints Summary...
  (DESCRIPTION=(ADDRESS=(PROTOCOL=tcp)(HOST=192.168.75.3)(PORT=1531)))
Services Summary...
Service "orcl" has 1 instance(s).
  Instance "orcl", status UNKNOWN, has 1 handler(s) for this service...
The command completed successfully
14.登录数据库
[oracle@a admin]$ sqlplus / as sysdba

SQL*Plus: Release 11.2.0.1.0 Production on Sat Aug 20 04:59:01 2016

Copyright (c) 1982, 2009, Oracle.  All rights reserved.


Connected to:
Oracle Database 11g Enterprise Edition Release 11.2.0.1.0 - 64bit Production
With the Partitioning, OLAP, Data Mining and Real Application Testing options

SQL>
15.启动数据库
SQL> startup
ORACLE instance started.

Total System Global Area  308981760 bytes
Fixed Size                  2212896 bytes
Variable Size             104860640 bytes
Database Buffers          197132288 bytes
Redo Buffers                4775936 bytes
Database mounted.
Database opened.
16.设置Oracle开机自动启动
vi /etc/oratab
#


# This file is used by ORACLE utilities.  It is created by root.sh
# and updated by the Database Configuration Assistant when creating
# a database.

# A colon, ':', is used as the field terminator.  A new line terminates
# the entry.  Lines beginning with a pound sign, '#', are comments.
#
# Entries are of the form:
#   $ORACLE_SID:$ORACLE_HOME::
#
# The first and second fields are the system identifier and home
# directory of the database respectively.  The third filed indicates
# to the dbstart utility that the database should , "Y", or should not,
# "N", be brought up at system boot time.
#
# Multiple entries with the same $ORACLE_SID are not allowed.
#
#
orcl:/u01/app/oracle/product/11.2.0/db:N 将此处的N改为Y
说明:orcl为实例名;/u01/app/oracle/product/11.2.0/db为oracle安装目录;会因安装的情况不同而有所不同。
vi /etc/rc.d/rc.local 添加以下内容,根据实际路径添加
su oracle -lc "/u01/app/oracle/product/11.2.0/db/bin/lsnrctl start"
su oracle -lc /u01/app/oracle/product/11.2.0/db/bin/dbstart
三、遇到的问题
1.LRM-00109: could not open parameter file '/u01/app/oracle/product/11.2.0/db/dbs/initorcl.ora'
SQL> startup
ORA-01078: failure in processing system parameters
LRM-00109: could not open parameter file '/u01/app/oracle/product/11.2.0/db/dbs/initorcl.ora'
解决方案:
cp /u01/app/oracle/admin/orcl/pfile/init.ora.719201614651 /u01/app/oracle/product/11.2.0/db/dbs/initorcl.ora
2.ORA-01102: cannot mount database in EXCLUSIVE mode
SQL> startup
ORACLE instance started.

Total System Global Area  308981760 bytes
Fixed Size                  2212896 bytes
Variable Size             104860640 bytes
Database Buffers          197132288 bytes
Redo Buffers                4775936 bytes
ORA-01102: cannot mount database in EXCLUSIVE mode
解决方案:
kill -9 `ps -ef|grep ora |awk '{print $2}'`
3.The listener supports no services
[oracle@a admin]$ lsnrctl start

LSNRCTL for Linux: Version 11.2.0.1.0 - Production on 28-AUG-2016 07:46:14

Copyright (c) 1991, 2009, Oracle.  All rights reserved.

Starting /u01/app/oracle/product/11.2.0/db/bin/tnslsnr: please wait...

TNSLSNR for Linux: Version 11.2.0.1.0 - Production
System parameter file is /u01/app/oracle/product/11.2.0/db/network/admin/listener.ora
Log messages written to /u01/app/oracle/diag/tnslsnr/a/listener/alert/log.xml
Listening on: (DESCRIPTION=(ADDRESS=(PROTOCOL=tcp)(HOST=a.wlzs.cn)(PORT=1521)))

Connecting to (ADDRESS=(PROTOCOL=tcp)(HOST=)(PORT=1521))
STATUS of the LISTENER
------------------------
Alias                     LISTENER
Version                   TNSLSNR for Linux: Version 11.2.0.1.0 - Production
Start Date                28-AUG-2016 07:46:14
Uptime                    0 days 0 hr. 0 min. 0 sec
Trace Level               off
Security                  ON: Local OS Authentication
SNMP                      OFF
Listener Parameter File   /u01/app/oracle/product/11.2.0/db/network/admin/listener.ora
Listener Log File         /u01/app/oracle/diag/tnslsnr/a/listener/alert/log.xml
Listening Endpoints Summary...
  (DESCRIPTION=(ADDRESS=(PROTOCOL=tcp)(HOST=a.wlzs.cn)(PORT=1521)))
The listener supports no services
The command completed successfully
解决方案:
查看/u01/app/oracle/product/11.2.0/db/network/admin/listener.ora文件是否存在,本案例中,在检查文件时,发现复制的配置文件里面出现格式错误,情况如下:
正确的格式为:

二〇一六年八月二十七日 13:28:13